Loxilb 是一个基于 GoLang/eBPF 的开源云原生负载均衡器,旨在实现跨各种本地、公有云或混合 K8s 环境的交叉兼容性。loxilb 的开发是为了支持电信、移动和边缘计算领域采用云原生技术。
K3s 是一个轻量级 Kubernetes 发行版,专门针对 边缘计算、IoT、CI/CD、本地开发以及资源受限环境进行了优化。
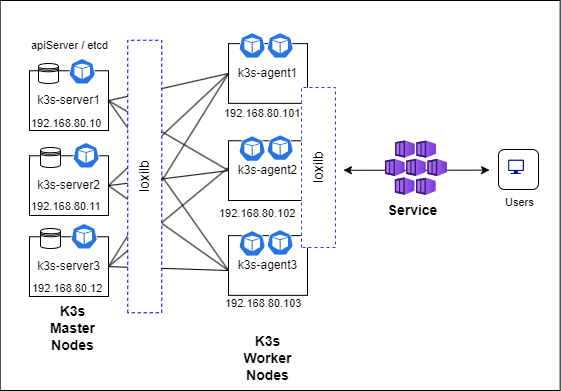
本文将介绍如何安装一个多主高可用 K3s 集群,不仅会将 loxilb 作为集群的 ServiceLB 提供程序,还会将其用作访问 server/master 服务的 VIP-LB。
拓扑结构
在多主 K3s 集群设置中,我们需要使用奇数个 server 节点来维持仲裁(quorum)。因此,在本次部署中,我们将使用 3 个 k3s-server 节点。整体上,各个组件的部署拓扑如下所示:
K3s 安装与配置
在 k3s-server1 节点上执行以下命令:
$ curl -fL https://get.k3s.io | sh -s - server --node-ip=192.168.80.10 \
  --disable servicelb --disable traefik --cluster-init external-hostname=192.168.80.10 \
  --node-external-ip=192.168.80.80 --disable-cloud-controller
需要注意的是,--node-external-ip=192.168.80.80 选项用于指定 192.168.80.80 作为 VIP(虚拟 IP),以便 k3s-agent 和其他客户端可以访问多主集群。
配置 loxilb
创建 loxilb 配置目录:
sudo mkdir -p /etc/loxilb
在 /etc/loxilb 目录下创建以下两个文件:
- lbconfig.txt(请根据实际需求修改其内容)
{
   "lbAttr":[
      {
         "serviceArguments":{
            "externalIP":"192.168.80.80",
            "port":6443,
            "protocol":"tcp",
            "sel":0,
            "mode":2,
            "BGP":false,
            "Monitor":true,
            "inactiveTimeOut":240,
            "block":0
         },
         "secondaryIPs":null,
         "endpoints":[
            {
               "endpointIP":"192.168.80.10",
               "targetPort":6443,
               "weight":1,
               "state":"active",
               "counter":""
            },
            {
               "endpointIP":"192.168.80.11",
               "targetPort":6443,
               "weight":1,
               "state":"active",
               "counter":""
            },
            {
               "endpointIP":"192.168.80.12",
               "targetPort":6443,
               "weight":1,
               "state":"active",
               "counter":""
            }
         ]
      }
   ]
}
- EPconfig.txt(请根据实际需求修改其内容)
{
   "Attr":[
      {
         "hostName":"192.168.80.10",
         "name":"192.168.80.10_tcp_6443",
         "inactiveReTries":2,
         "probeType":"tcp",
         "probeReq":"",
         "probeResp":"",
         "probeDuration":10,
         "probePort":6443
      },
      {
         "hostName":"192.168.80.11",
         "name":"192.168.80.11_tcp_6443",
         "inactiveReTries":2,
         "probeType":"tcp",
         "probeReq":"",
         "probeResp":"",
         "probeDuration":10,
         "probePort":6443
      },
      {
         "hostName":"192.168.80.12",
         "name":"192.168.80.12_tcp_6443",
         "inactiveReTries":2,
         "probeType":"tcp",
         "probeReq":"",
         "probeResp":"",
         "probeDuration":10,
         "probePort":6443
      }
   ]
}
这些文件用于初始化 LB 规则,以便后续对 k3s-server 节点进行负载均衡。
在 k3s-server2 节点进行 K3s 安装和设置
$ curl -fL https://get.k3s.io | K3S_TOKEN=${NODE_TOKEN} sh -s - server --server https://192.168.80.10:6443 \
  --disable traefik --disable servicelb --node-ip=192.168.80.11 \
  external-hostname=192.168.80.11 --node-external-ip=192.168.80.80
其中,NODE_TOKEN 的值为 server1 节点 /var/lib/rancher/k3s/server/node-token 文件的内容。例如,可以使用以下命令设置 NODE_TOKEN:
export NODE_TOKEN=$(cat node-token)
配置 loxilb:
按照 server1 的步骤进行相同的配置,也就是说也需要创建:/etc/loxilb/lbconfig.txt 和 /etc/loxilb/EPconfig.txt 这两个文件。
在 k3s-server3 节点进行 K3s 安装和设置
$ curl -fL https://get.k3s.io | K3S_TOKEN=${NODE_TOKEN} sh -s - server --server https://192.168.80.10:6443 \
  --disable traefik --disable servicelb --node-ip=192.168.80.12 \
  external-hostname=192.168.80.12 --node-external-ip=192.168.80.80
同样,NODE_TOKEN 的值需要从 server1 获取:
export NODE_TOKEN=$(cat node-token)
配置 loxilb:
按照 server1 的步骤进行相同的配置,也就是说也需要创建:/etc/loxilb/lbconfig.txt 和 /etc/loxilb/EPconfig.txt 这两个文件。
此外,我们还必须启动 loxilb pod 实例,具体方法如下:
$ sudo kubectl apply -f - <<EOF
apiVersion: apps/v1
kind: DaemonSet
metadata:
  name: loxilb-lb
  namespace: kube-system
spec:
  selector:
    matchLabels:
      app: loxilb-app
  template:
    metadata:
      name: loxilb-lb
      labels:
        app: loxilb-app
    spec:
      hostNetwork: true
      dnsPolicy: ClusterFirstWithHostNet
      tolerations:
      - key: "node-role.kubernetes.io/master"
        operator: Exists
      - key: "node-role.kubernetes.io/control-plane"
        operator: Exists
      affinity:
        nodeAffinity:
          requiredDuringSchedulingIgnoredDuringExecution:
            nodeSelectorTerms:
            - matchExpressions:
              - key: "node-role.kubernetes.io/master"
                operator: Exists
              - key: "node-role.kubernetes.io/control-plane"
                operator: Exists
      volumes:
      - name: hllb
        hostPath:
          path: /etc/loxilb
          type: DirectoryOrCreate
      containers:
      - name: loxilb-app
        image: "ghcr.io/loxilb-io/loxilb:latest"
        imagePullPolicy: Always
        command:
        - /root/loxilb-io/loxilb/loxilb
        args:
        - --egr-hooks
        - --blacklist=cni[0-9a-z]|veth.|flannel.
        volumeMounts:
        - name: hllb
          mountPath: /etc/loxilb
        ports:
        - containerPort: 11111
        - containerPort: 179
        securityContext:
          privileged: true
          capabilities:
            add:
              - SYS_ADMIN
---
apiVersion: v1
kind: Service
metadata:
  name: loxilb-lb-service
  namespace: kube-system
spec:
  clusterIP: None
  selector:
    app: loxilb-app
  ports:
  - name: loxilb-app
    port: 11111
    targetPort: 11111
    protocol: TCP
EOF
请注意,loxilb 的参数可能会根据具体场景进行调整。本指南假设 loxilb 运行在 in-cluster 模式。如果需要 service-proxy 模式,请参考相应的 YAML 文件以获取准确的参数配置。
sudo kubectl apply -f - <<EOF
---
apiVersion: v1
kind: ServiceAccount
metadata:
  name: kube-loxilb
  namespace: kube-system
---
kind: ClusterRole
apiVersion: rbac.authorization.k8s.io/v1
metadata:
  name: kube-loxilb
rules:
  - apiGroups:
      - ""
    resources:
      - nodes
    verbs:
      - get
      - watch
      - list
      - patch
  - apiGroups:
      - ""
    resources:
      - pods
    verbs:
      - get
      - watch
      - list
      - patch
  - apiGroups:
      - ""
    resources:
      - endpoints
      - services
      - services/status
    verbs:
      - get
      - watch
      - list
      - patch
      - update
  - apiGroups:
      - gateway.networking.k8s.io
    resources:
      - gatewayclasses
      - gatewayclasses/status
      - gateways
      - gateways/status
      - tcproutes
      - udproutes
    verbs: ["get", "watch", "list", "patch", "update"]
  - apiGroups:
      - discovery.k8s.io
    resources:
      - endpointslices
    verbs:
      - get
      - watch
      - list
  - apiGroups:
      - authentication.k8s.io
    resources:
      - tokenreviews
    verbs:
      - create
  - apiGroups:
      - authorization.k8s.io
    resources:
      - subjectaccessreviews
    verbs:
      - create
  - apiGroups:
      - bgppeer.loxilb.io
    resources:
      - bgppeerservices
    verbs:
      - get
      - watch
      - list
      - create
      - update
      - delete
  - apiGroups:
      - bgppolicydefinedsets.loxilb.io
    resources:
      - bgppolicydefinedsetsservices
    verbs:
      - get
      - watch
      - list
      - create
      - update
      - delete
  - apiGroups:
      - bgppolicydefinition.loxilb.io
    resources:
      - bgppolicydefinitionservices
    verbs:
      - get
      - watch
      - list
      - create
      - update
      - delete
  - apiGroups:
      - bgppolicyapply.loxilb.io
    resources:
      - bgppolicyapplyservices
    verbs:
      - get
      - watch
      - list
      - create
      - update
      - delete
---
kind: ClusterRoleBinding
apiVersion: rbac.authorization.k8s.io/v1
metadata:
  name: kube-loxilb
roleRef:
  apiGroup: rbac.authorization.k8s.io
  kind: ClusterRole
  name: kube-loxilb
subjects:
  - kind: ServiceAccount
    name: kube-loxilb
    namespace: kube-system
---
apiVersion: rbac.authorization.k8s.io/v1
kind: ClusterRole
metadata:
  name: kube-loxilb-clusterrole
rules:
- apiGroups: [""]
  resources: ["namespaces"]
  verbs: ["list", "watch"]
---
apiVersion: rbac.authorization.k8s.io/v1
kind: ClusterRoleBinding
metadata:
  name: kube-loxilb-clusterrolebinding
subjects:
- kind: ServiceAccount
  name: kube-loxilb
  namespace: kube-system
roleRef:
  kind: ClusterRole
  name: kube-loxilb-clusterrole
  apiGroup: rbac.authorization.k8s.io
---
apiVersion: apps/v1
kind: Deployment
metadata:
  name: kube-loxilb
  namespace: kube-system
  labels:
    app: kube-loxilb-app
spec:
  replicas: 1
  selector:
    matchLabels:
      app: kube-loxilb-app
  template:
    metadata:
      labels:
        app: kube-loxilb-app
    spec:
      hostNetwork: true
      dnsPolicy: ClusterFirstWithHostNet
      tolerations:
        # Mark the pod as a critical add-on for rescheduling.
        - key: CriticalAddonsOnly
          operator: Exists
      priorityClassName: system-node-critical
      serviceAccountName: kube-loxilb
      terminationGracePeriodSeconds: 0
      containers:
      - name: kube-loxilb
        image: ghcr.io/loxilb-io/kube-loxilb:latest
        imagePullPolicy: Always
        command:
        - /bin/kube-loxilb
        args:
        #- --loxiURL=http://192.168.80.10:11111
        - --externalCIDR=192.168.80.200/32
        #- --externalSecondaryCIDRs=124.124.124.1/24,125.125.125.1/24
        #- --setBGP=64512
        #- --listenBGPPort=1791
        - --setRoles=0.0.0.0
        #- --monitor
        #- --extBGPPeers=50.50.50.1:65101,51.51.51.1:65102
        #- --setLBMode=1
        #- --config=/opt/loxilb/agent/kube-loxilb.conf
        resources:
          requests:
            cpu: "100m"
            memory: "50Mi"
          limits:
            cpu: "100m"
            memory: "50Mi"
        securityContext:
          privileged: true
          capabilities:
            add: ["NET_ADMIN", "NET_RAW"]
EOF
此时,我们可以检查在我们的 kubernetes 集群中运行的 pod:
$ sudo kubectl get pods -A
NAMESPACE     NAME                                      READY   STATUS    RESTARTS   AGE
kube-system   coredns-6799fbcd5-7jhcx                   1/1     Running   0          3h15m
kube-system   kube-loxilb-5d99c445f7-j4x6k              1/1     Running   0          3h6m
kube-system   local-path-provisioner-6c86858495-pjn9j   1/1     Running   0          3h15m
kube-system   loxilb-lb-8bddf                           1/1     Running   0          3h6m
kube-system   loxilb-lb-nsrr9                           1/1     Running   0          3h6m
kube-system   loxilb-lb-fp2z6                           1/1     Running   0          3h6m
kube-system   metrics-server-54fd9b65b-g5lfn            1/1     Running   0          3h15m
加入 k3s-agent1 到集群
在 agent 节点上安装 k3s 需要遵循以下步骤:
$ curl -sfL https://get.k3s.io | \
  K3S_TOKEN=${NODE_TOKEN} sh -s - agent \
  --server https://192.168.80.80:6443 \
  --node-ip=${WORKER_ADDR} \
  --node-external-ip=${WORKER_ADDR}
其中 WORKER_ADDR 是 agent 节点本身的 IP 地址(在本例中为 192.168.80.101),NODE_TOKEN 包含来自 server1 的 /var/lib/rancher/k3s/server/node-token 的内容。
还要注意的是,我们使用 loxilb 提供的 VIP - 192.168.80.80 来访问主 K3s 节点,而不是实际的私有节点地址。
对于其余的 agent 节点,我们可以按照上面针对 k3s-agent1 概述的相同步骤进行操作。
验证
设置完所有 k3s-server 和 k3s-agent 后,我们应该能够看到所有节点都已启动并运行
$ sudo kubectl get nodes -A
NAME      STATUS   ROLES                       AGE   VERSION
master1   Ready    control-plane,etcd,master   4h    v1.29.3+k3s1
master2   Ready    control-plane,etcd,master   4h    v1.29.3+k3s1
master3   Ready    control-plane,etcd,master   4h    v1.29.3+k3s1
worker1   Ready    <none>                      4h    v1.29.3+k3s1
worker2   Ready    <none>                      4h    v1.29.3+k3s1
worker3   Ready    <none>                      4h    v1.29.3+k3s1
为了验证,我们关闭 master1 k3s-server。
## Run shutdown the master1 node
$ sudo shutdown -t now
并尝试从其他主节点或工作节点访问集群信息:
$ sudo kubectl get nodes -A
NAME      STATUS     ROLES                       AGE      VERSION
master1   NotReady   control-plane,etcd,master   4h10m    v1.29.3+k3s1
master2   Ready      control-plane,etcd,master   4h10m    v1.29.3+k3s1
master3   Ready      control-plane,etcd,master   4h10m    v1.29.3+k3s1
worker1   Ready      <none>                      4h10m    v1.29.3+k3s1
worker2   Ready      <none>                      4h10m    v1.29.3+k3s1
此外,我们可以确认 pod 被重新安排到其他 “Ready” 节点:
$ sudo kubectl get pods -A -o wide
NAMESPACE     NAME                                      READY   STATUS        RESTARTS   AGE     IP              NODE      NOMINATED NODE   READINESS GATES
kube-system   coredns-6799fbcd5-6dvm7                   1/1     Running       0          27m     10.42.2.2       master3   <none>           <none>
kube-system   coredns-6799fbcd5-mrjgt                   1/1     Terminating   0          3h58m   10.42.0.4       master1   <none>           <none>
kube-system   kube-loxilb-5d99c445f7-x7qd6              1/1     Running       0          3h58m   192.168.80.11   master2   <none>           <none>
kube-system   local-path-provisioner-6c86858495-6f8rz   1/1     Terminating   0          3h58m   10.42.0.2       master1   <none>           <none>
kube-system   local-path-provisioner-6c86858495-z2p6m   1/1     Running       0          27m     10.42.3.2       worker1   <none>           <none>
kube-system   loxilb-lb-65jnz                           1/1     Running       0          3h58m   192.168.80.10   master1   <none>           <none>
kube-system   loxilb-lb-pfkf8                           1/1     Running       0          3h58m   192.168.80.12   master3   <none>           <none>
kube-system   loxilb-lb-xhr95                           1/1     Running       0          3h58m   192.168.80.11   master2   <none>           <none>
kube-system   metrics-server-54fd9b65b-l5pqz            1/1     Running       0          27m     10.42.4.2       worker2   <none>           <none>
kube-system   metrics-server-54fd9b65b-x9bd7            1/1     Terminating   0          3h58m   10.42.0.3       master1   <none>           <none>
如果上述命令集在任何 Ready 节点上正常工作,则表明即使其中一个 k3s server 发生故障,apiserver 仍然可用。如果需要,也可以对除 K8s/K3s apiserver 之外的任何服务执行相同的操作。