使用 Rancher Cluster API 实现集群自动扩缩容,从未如此简单
Kubernetes 彻底改变了应用的部署和管理方式。然而,当平台团队需要频繁地手动调整集群规模以应对变化的负载时,往往会陷入“不是资源不足,就是资源浪费”的困局。虽然云厂商提供的自动扩缩容工具基本可用,但它们往往难以真正做到“以 Kubernetes 状态为中心”的动态扩缩容,尤其是在面对异构基础设施的现实环境中。
这正是 SUSE Rancher Prime 与 Cluster API(CAPI)大显身手的地方。CAPI 通过扩展 Kubernetes API,提供了创建和自动扩缩容集群的基础能力,使我们能够在任何基础设施(无论是公有云还是本地环境)上复用相同的声明式操作方式。
本文将深入探讨 SUSE Rancher Prime 与 Rancher Cluster API 如何帮助构建高效的 Kubernetes 平台,并提供实际操作教程,助你快速上手。
自动扩缩容的挑战
自动扩缩容的挑战并不仅仅是“用脚本替代人工操作”这么简单。传统的自动化工具大多运行在 Kubernetes 之外,无法感知集群的内部状态变化。
像 AWS Auto Scaling Group(ASG)或 GKE 集群自动扩容器这类工具虽然好用,但它们只关注基础设施层面的资源,而无法及时响应 Kubernetes 的内部事件。这就造成了核心矛盾:Kubernetes 知道自己何时需要更多资源,但基础设施却感知不到,从而导致在高峰期资源不足、低谷期资源浪费的情况。
这个问题在多云或混合云环境中更加明显。传统的扩缩容工具通常只支持特定云平台,难以兼容 Harvester 或 vSphere 等本地虚拟化平台(而这些平台在很多企业中占据着重要地位)。于是,平台团队不得不使用多个不同厂商的工具,破坏了统一平台的理想状态。
Kubernetes 原生的自动扩缩容方式
SUSE Rancher Prime 搭配 Rancher Cluster API 提供了一个强大而声明式的基础设施生命周期管理方式,完美解决了上述问题。
Rancher Cluster API 通过扩展 Kubernetes API,将底层基础设施资源纳入 Kubernetes 的声明式管理范畴。例如,它允许通过自定义资源 MachineDeployment 定义节点池,就像你用 Deployment 控制应用 Pod 的副本一样,MachineDeployment 则用于控制 VM 的数量和状态。
而自动扩缩容的核心引擎 Kubernetes Cluster Autoscaler 则负责监听调度失败的 Pod(通常因资源不足),然后自动通知 Rancher 去扩容指定的节点池。Cluster API 随后会根据不同的底层平台,完成虚拟机的创建和节点加入集群的过程。
这种职责分离机制,既保持了架构的清晰,又实现了极大的灵活性 —— 只要该基础设施平台受 Rancher Prime 支持,就能无缝接入这个统一的自动扩缩容方案。实际上,Cluster Autoscaler 所要做的只是修改 Rancher 中 MachineDeployment 资源的节点数量。
从原理到实战:RKE2 集群自动扩缩容实操
在了解了整个架构之后,我们来动手实践,看看如何为一个由 CAPI 管理的 RKE2 集群启用自动扩缩容。

本文以运行在 Harvester 上的 RKE2 集群为例,但本问中的说明同样适用于 Rancher Node Drivers 支持的任何其他云服务提供商。
前置条件
在开始之前,请确保你已准备好以下环境:
- 一个部署了 SUSE Rancher Prime(2.6+)的管理(上游)集群
- 使用 Rancher Cluster API 配置的 RKE2(下游)集群(请参阅 Rancher Cluster API 教程作为参考)。
- 获取上述两个集群的 kubeconfig 文件
- 本地已安装
kubectl和helm
配置 Rancher 的 RBAC 权限
Cluster Autoscaler 需要有权限访问 Rancher 的 Cluster API 资源,具体包括:
- 获取和修改
clusters.provisioning.cattle.io类型资源(用于扩缩容) - 列出所在命名空间下的
machines.cluster.x-k8s.io资源
标注 RKE2 的工作节点池
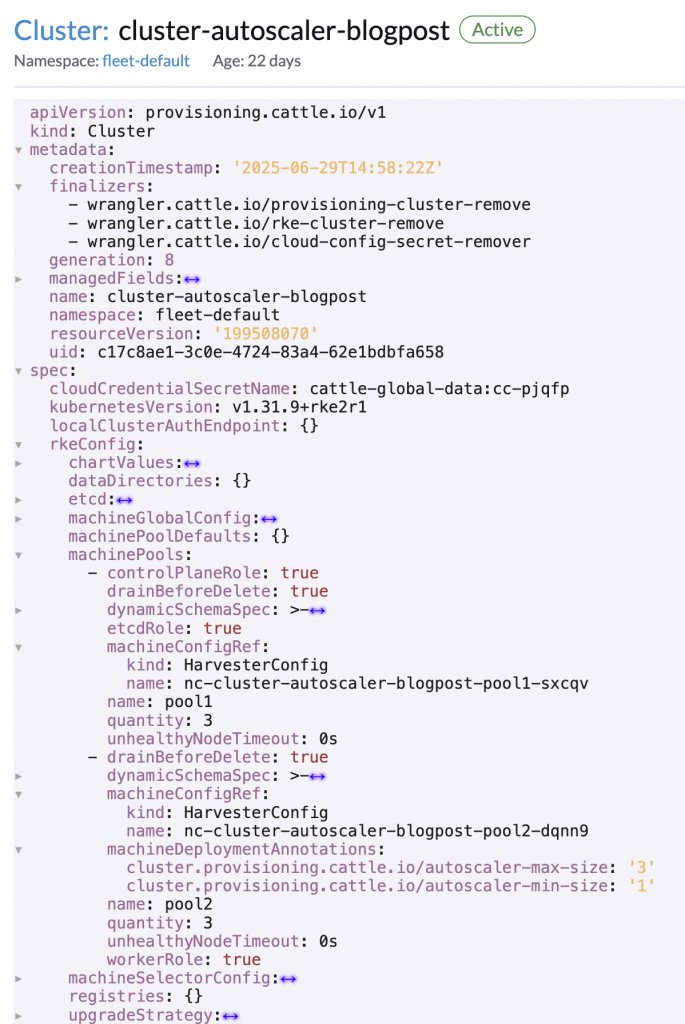
Cluster Autoscaler 需要知道它能扩容哪些节点池、每个池的最小/最大节点数。你可以通过在对应的 MachineDeployment 资源中添加如下注解来定义这些边界:
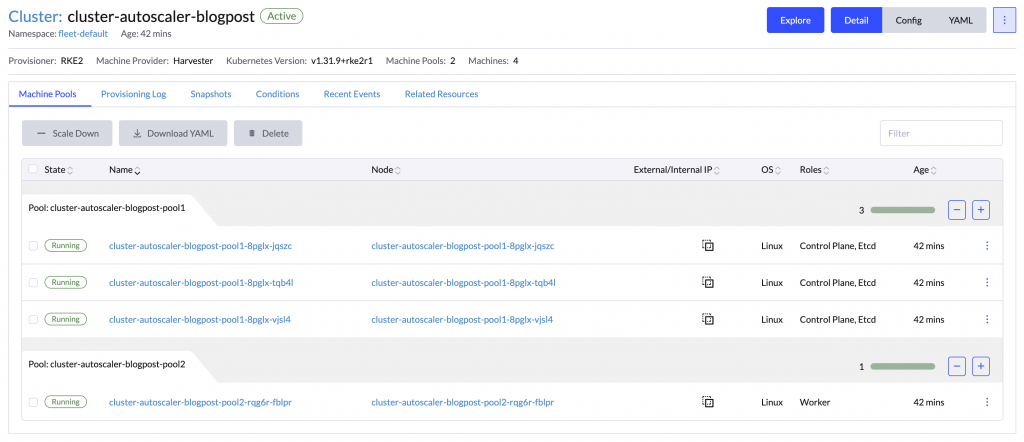
本教程将控制面节点和工作节点分别放在两个节点池中。控制面采用高可用配置(三个节点),而工作节点池则作为自动扩缩容的目标。
你可以通过如下命令编辑集群配置:
kubectl edit cluster.provisioning.cattle.io -n fleet-default cluster-autoscaler-blogpost
并将以下内容添加 machineDeploymentAnnotations 到工作节点池:
spec:
  rkeConfig:
    machinePools:
      - workerRole: true
        machineDeploymentAnnotations:
          cluster.k8s.io/cluster-api-autoscaler-node-group-min-size: "1"
          cluster.k8s.io/cluster-api-autoscaler-node-group-max-size: "3"
修改后 Cluster 应如下所示:
配置 Cluster Autoscaler
现在 RKE2 集群已准备好进行自动扩缩,接下来可以配置 Cluster Autoscaler 与 Rancher API 交互并动态调整 MachineDeployment 资源。配置文件应指定 Rancher API URL 和 token,以及 RKE2 集群的名称和命名空间:
创建如下 ConfigMap,配置 Cluster Autoscaler 访问 Rancher API 所需的信息:
---
apiVersion: v1
kind: ConfigMap
metadata:
  name: cluster-autoscaler-config
  namespace: kube-system
data:
  cluster-autoscaler-config.yaml: |
    url: <RANCHER_API_URL>
    token: <RANCHER_API_TOKEN>
    clusterName: cluster-autoscaler-blogpost
    clusterNamespace: fleet-default
---
apiVersion: v1
kind: ConfigMap
metadata:
  name: custom-ca-certs
  namespace: kube-system
data:
  ca-certificates.crt: |
    -----BEGIN CERTIFICATE-----
    ...
    -----END CERTIFICATE-----
---
然后,将其应用于下游 RKE2 集群中,你将在该集群中部署 Cluster Autoscaler:
kubectl apply -n kube-system -f cluster-autoscaler-config.yaml
部署 Cluster Autoscaler
Autoscaler 运行在 kube-system 命名空间中运行,并与上游 Rancher 和下游 Cluster API 资源交互。它将监控下游集群的资源分配,并自动调整 MachineDeployment 以相应地扩展或缩减节点数量。
在部署 Cluster Autoscaler 之前,请创建一个 values.yaml 文件,其中包含以下内容:
cloudProvider: rancher
cloudConfigPath: /etc/cluster-autoscaler/cluster-autoscaler-config.yaml
autoDiscovery:
  clusterName: cluster-autoscaler-blogpost
  clusterNamespace: fleet-default
tags:
  - k8s.io/cluster-autoscaler/enabled
  - k8s.io/cluster-autoscaler/cluster-autoscaler-blogpost
nodeSelector:
  node-role.kubernetes.io/control-plane: "true"
tolerations:
  - effect: NoSchedule
    operator: "Equal"
    key: "node-role.kubernetes.io/control-plane"
  - effect: NoExecute
    operator: "Equal"
    key: "node-role.kubernetes.io/etcd"
extraVolumeMounts:
  - name: cluster-autoscaler-config
    mountPath: /etc/cluster-autoscaler
    readOnly: true
  - name: custom-ca-certs
    mountPath: /etc/ssl/certs
    readOnly: true
extraVolumes:
  - name: cluster-autoscaler-config
    configMap:
      name: cluster-autoscaler-config
  - name: custom-ca-certs
    configMap:
      name: custom-ca-certs
在下游 RKE2 集群中安装 Cluster Autoscaler:
helm repo add autoscaler https://kubernetes.github.io/autoscaler
helm install cluster-autoscaler autoscaler/cluster-autoscaler -n kube-system -f values.yaml
确认其已成功识别可扩容的节点池:
kubectl logs -n kube-system deploy/cluster-autoscaler-rancher-cluster-autoscaler
日志示例:
[... static_autoscaler.go:274] Starting main loop
[... rancher_provider.go:234] ignoring machine pool cluster-autoscaler-blogpost-pool1 as it does not have min/max annotations
[... rancher_provider.go:241] scalable node group found: cluster-autoscaler-blogpost-pool2 (1:3)
[... rancher_provider.go:170] found pool "cluster-autoscaler-blogpost-pool2" via machine "cluster-autoscaler-blogpost-pool2-fvbfp-xpmgb"
验证自动扩容效果
创建一个高资源消耗的测试 Deployment:
---
apiVersion: apps/v1
kind: Deployment
metadata:
  labels:
    app: hello-world
  name: hello-world
spec:
  replicas: 3 # you may need to adjust replica number to trigger autoscaling
  selector:
    matchLabels:
      app: hello-world
  template:
    metadata:
      labels:
        app: hello-world
    spec:
      containers:
        - image: rancher/hello-world
          name: hello-world
          imagePullPolicy: Always
          ports:
            - containerPort: 80
              protocol: TCP
          resources: # you may need to adjust resources to trigger autoscaling
            limits:
              cpu: 1
              memory: 8Gi
            requests:
              cpu: 1
              memory: 8Gi
---
在下游 RKE2 集群的任意命名空间中应用上述工作负载:
kubectl apply -f test-cluster-autoscaler.yaml
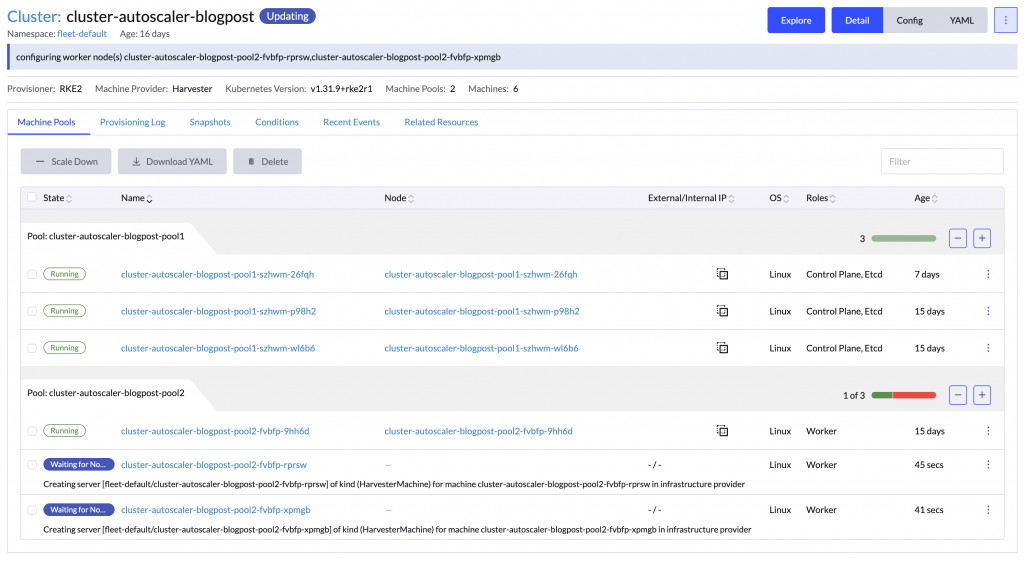
当现有节点资源不足时,Cluster Autoscaler 会自动扩容节点池,新增节点加入集群。
验证自动缩容效果
扩容验证完毕后,请缩容或删除测试部署:
kubectl scale deploy/test-cluster-autoscaler -n kube-system --replicas=0
随后,你将在日志中看到如下提示,表示 Autoscaler 正在准备缩容:
kubectl logs -n kube-system deploy/cluster-autoscaler-rancher-cluster-autoscaler
[... nodes.go:85] cluster-autoscaler-blogpost-pool2-fvbfp-rprsw is unneeded since 2025-07-21 16:25:17.916797713 +0000 UTC m=+1131641.728403920 duration 3m41.254893434s
[... nodes.go:85] cluster-autoscaler-blogpost-pool2-fvbfp-xpmgb is unneeded since 2025-07-21 16:25:17.916797713 +0000 UTC m=+1131641.728403920 duration 3m41.254893434s
总结
本文展示了如何借助 SUSE Rancher Prime 与 Cluster API 实现真正 Kubernetes 原生的自动扩缩容能力。
通过将底层基础设施纳入 Kubernetes 的声明式管理体系,结合 Cluster Autoscaler 强大的自动感知能力,我们得以在任意环境中轻松实现横向扩展,彻底摆脱资源浪费与工具碎片化困境。
这一方案不依赖特定厂商,自动响应应用需求,帮助平台团队节省运维成本,真正做到“资源弹性、自如掌控”。
如果你希望在自己的平台中实践该方案,不妨马上试试 Rancher Cluster API 与 Cluster Autoscaler 的组合,让 Kubernetes 真正成为“自驱动”的基础设施平台。